

How To Install Windows In A Brick House
Synopsis: While window replacement has become a fairly standard remodeling task, it can still present challenges, peculiarly when the window being replaced is in a brick wall. In this article, veteran remodeling contractor Mike Sloggatt describes his procedure for this catchy project. To starting time, Sloggatt preps the opening, taking intendance with the removal of the old window. Next, he flashes the rough opening and makes sure to integrate the new wall sheathing with the existing building paper. Sloggatt's next step is to integrate the new window with the wall. Kickoff, he installs the window, using caulk and foam to air-seal and weatherize; then, he adds an extra layer of sealing for more protection. Finally, Sloggatt installs a site-congenital sill pan.
In the 30-plus years that I've been a remodeling contractor, I've replaced hundreds of windows. The difficulties in window replacement vary by project, but one thing is certain: Replacements in brick veneered homes are among the most challenging. Why? Masonry openings are hard and expensive to change, and integrating a new window into a home'southward existing weather barrier is vastly more hard when a layer of brick is in the way.
Further complicating matters, there are two means to become a new window in an existing brick opening. The easier, less expensive pick is a replacement window where only the sash and residuum organisation are replaced. With a full-frame replacement, the unabridged window, including the frame, is replaced.
Given that a replacement window is cheaper and easier to install, why cull a full-frame replacement? If the frame is rotted or insect-damaged, a full frame is generally the ameliorate approach. Likewise, if there'south evidence of water intrusion around the window opening, a total-frame replacement lets you find out what'south going on and gives you admission to fix it. The window in this house, which likely dates from the 1950s, was rotted badly enough that a full-frame replacement was the just sensible way to go.
Fortunately, nigh window manufacturers now make windows in custom sizes, and prices are affordable. You lot no longer take to alter masonry openings or pad the hole with trim to make a stock window fit. The merely caveat is that yous'll want to double- and triple-check all relevant measurements before ordering the unit, because getting the incorrect size is an expensive fault. Your window dealer or the manufacturer's website is a skilful place to look for guidance on proper measuring. In improver, custom window sizes may have longer lead times than stock sizes, so inquire about delivery times when placing an order.
Here, I purposely shrunk the window so that it would fit within the existing opening with the nail fin intact. The smash fin was covered with flat stock that matched the house's other existing windows. The event was a new energy-efficient window that matched the older units in the house well.
The first step in whatsoever window-replacement project is removing the erstwhile window. It'due south tempting to remove the old window as apace as possible, but a become-slow approach means that you're less likely to damage plaster and finishes surrounding the window. On this firm, the interior plaster was installed later the window and was keyed into the window frame. I couldn't have known this before I started removing the old window frame, and tearing the window apart would probable take resulted in pregnant plaster damage and a much bigger project, higher costs for the homeowner, and a headache for me.
Prep The Opening
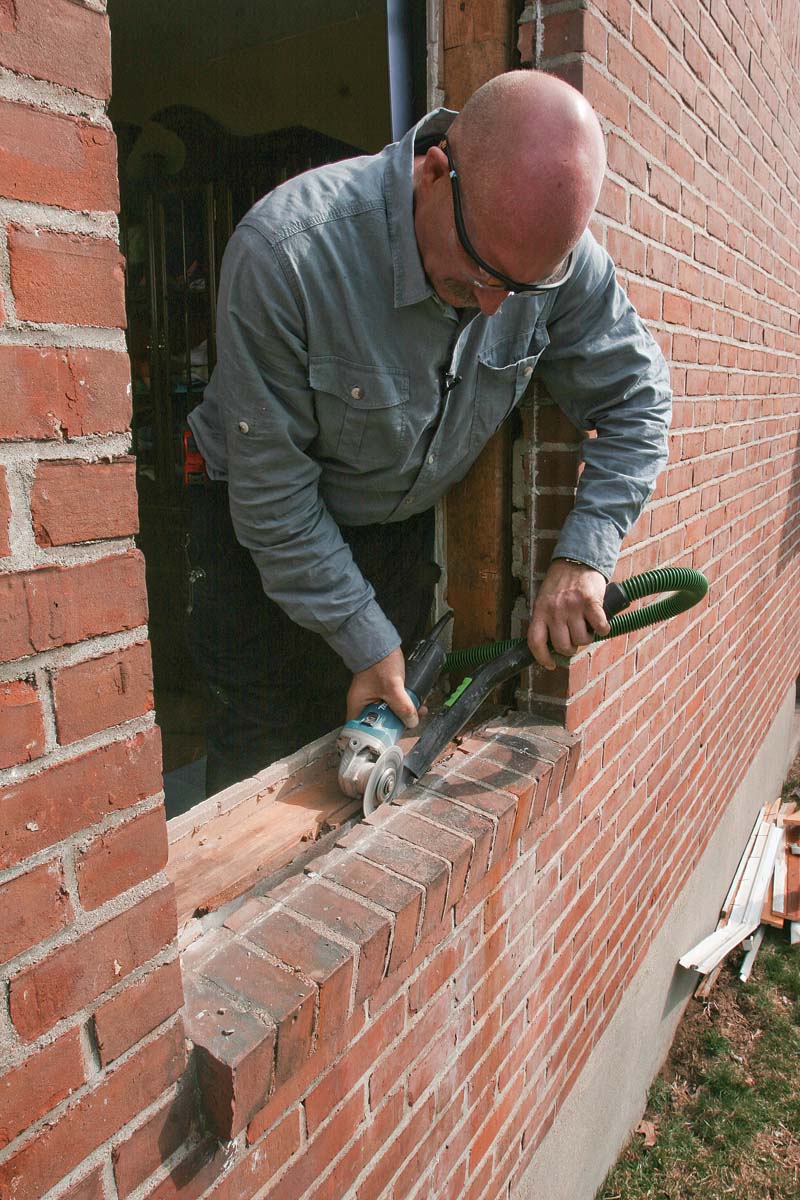
| Pull The Window Start past removing the sash, the residuum organization, and the tempest windows. Then cut the frame into pieces and gingerly pry them out. Here, the author is cutting nails that attach pieces of 1x wall sheathing to the window frame. This step prevents dissentious the home's existing #thirty felt weather barrier when these sheathing sections are removed. | Think Surgically Apply actress intendance when pulling the sometime window frame so that you lot don't damage existing plaster or drywall. On this firm, the plaster is keyed into the window frame, so the writer cuts the frame into sections and pulls out the sections ane at a time. |
 |  |
| Expose The Weather Barrier The most important function of replacing a window is integrating the new window with the existing felt or business firmwrap. Unfortunately, masonry openings often have chunks of mortar around the opening that must exist removed before you tin can integrate the new flashing materials. Employ an angle grinder and a chisel to remove the mortar without cutting or tearing the building paper. | Establish A Crude Opening A combination of 1x and 2x lumber is used to compress the framing to friction match the window's specified crude opening. The smaller opening allows the window's nailing flange to fit inside the masonry. Leaving the nailing flange intact makes flashing the window easier and maintains the manufacturer's warranty. |
 |  |
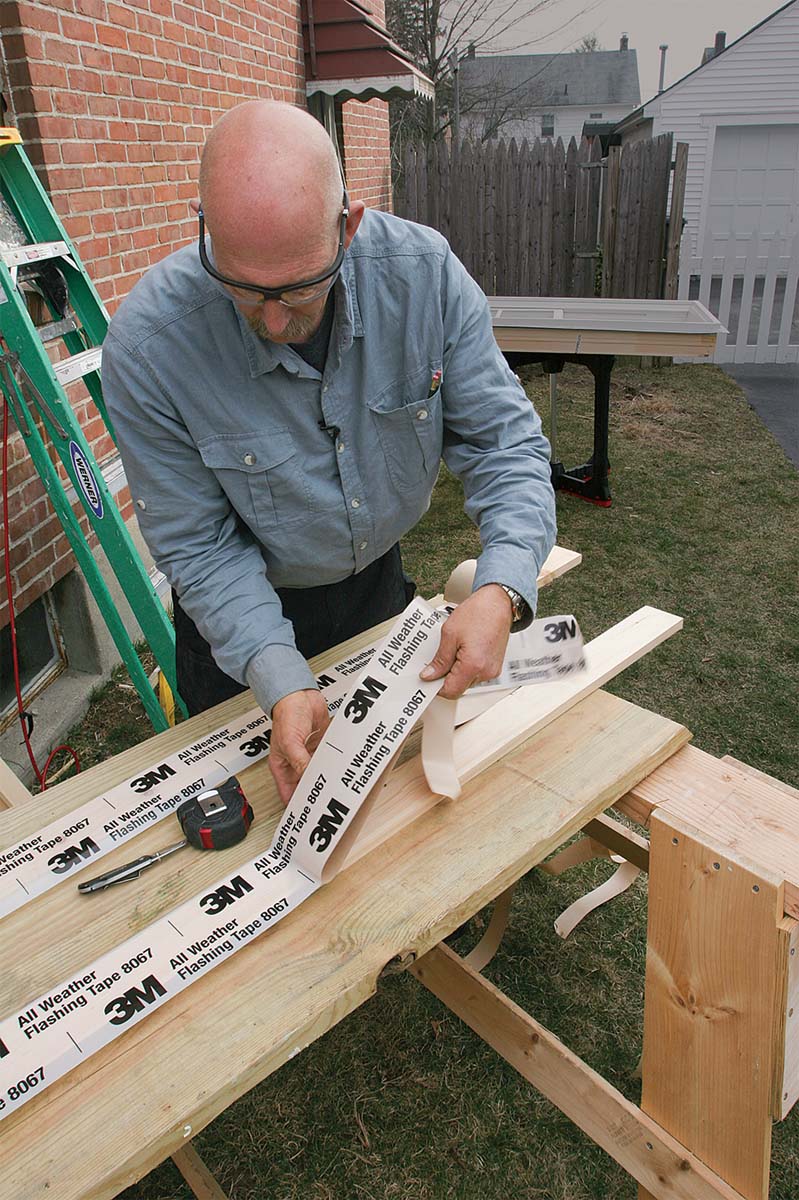
Flash The Rough Opening
Integrate new wall sheathing with existing building newspaper
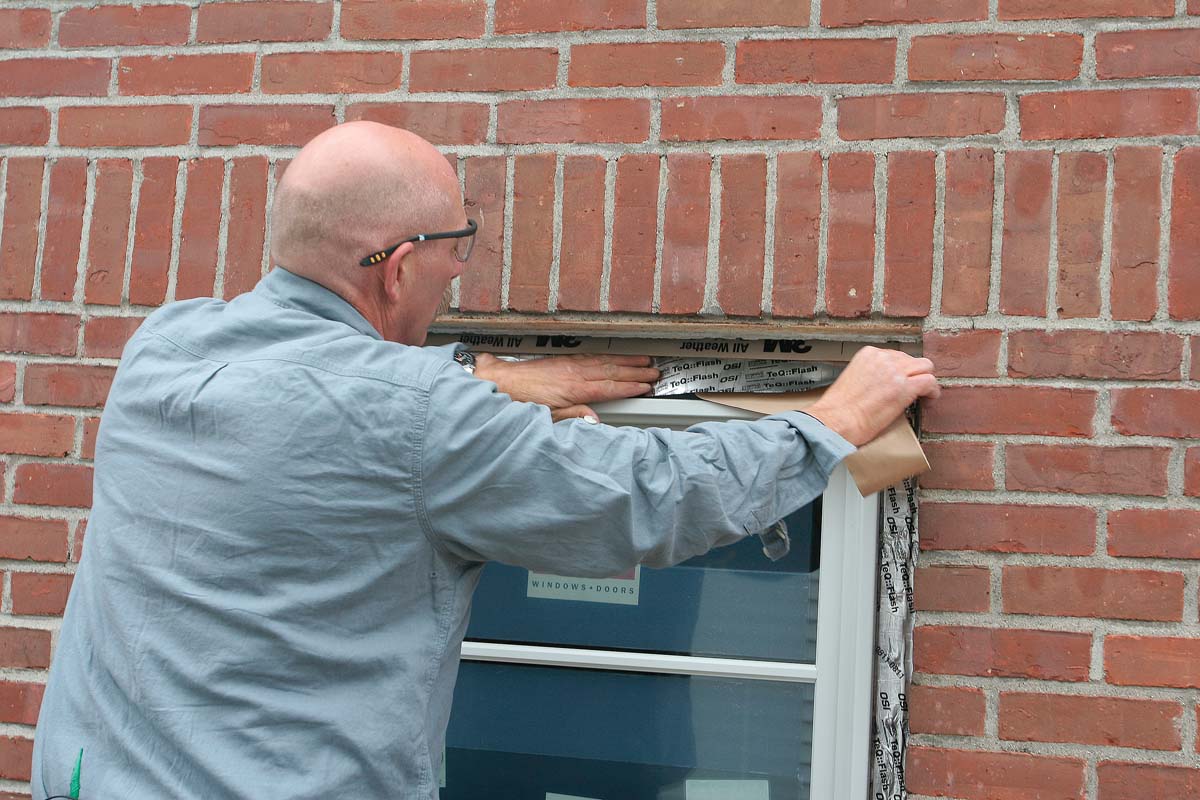
| Wrap The Capsule Because in that location's no room behind the brick veneer to apply a weather barrier over the sheathing patches, the author covers the patches with a sparse self-stick flashing record earlier installing them. | Slip In The Sheathing Fabricated from three ⁄ four -in. stock, the capsule patches around the new opening are coaxed behind the existing weather barrier with a 12-in. drywall knife. The knife helps to hold dorsum the old felt while the patches are pushed in behind it. |
 | 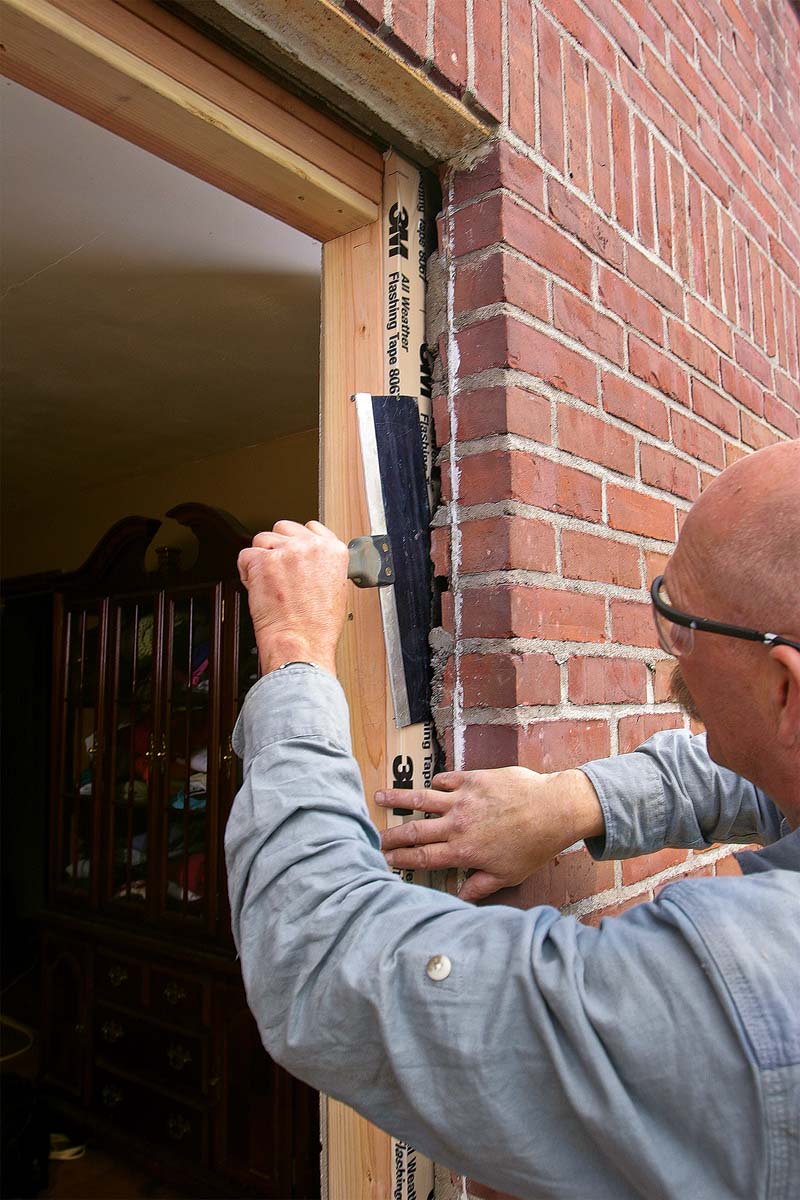 |
| Leave A Flap At The Summit The capsule patch at the pinnacle of the opening has an extra flap of flashing tape. The release paper is left on the flap and then that the window's height flange and head casing can be tucked under the flap, integrating them into the house's drainage airplane. |  |
Create a site-built sill pan
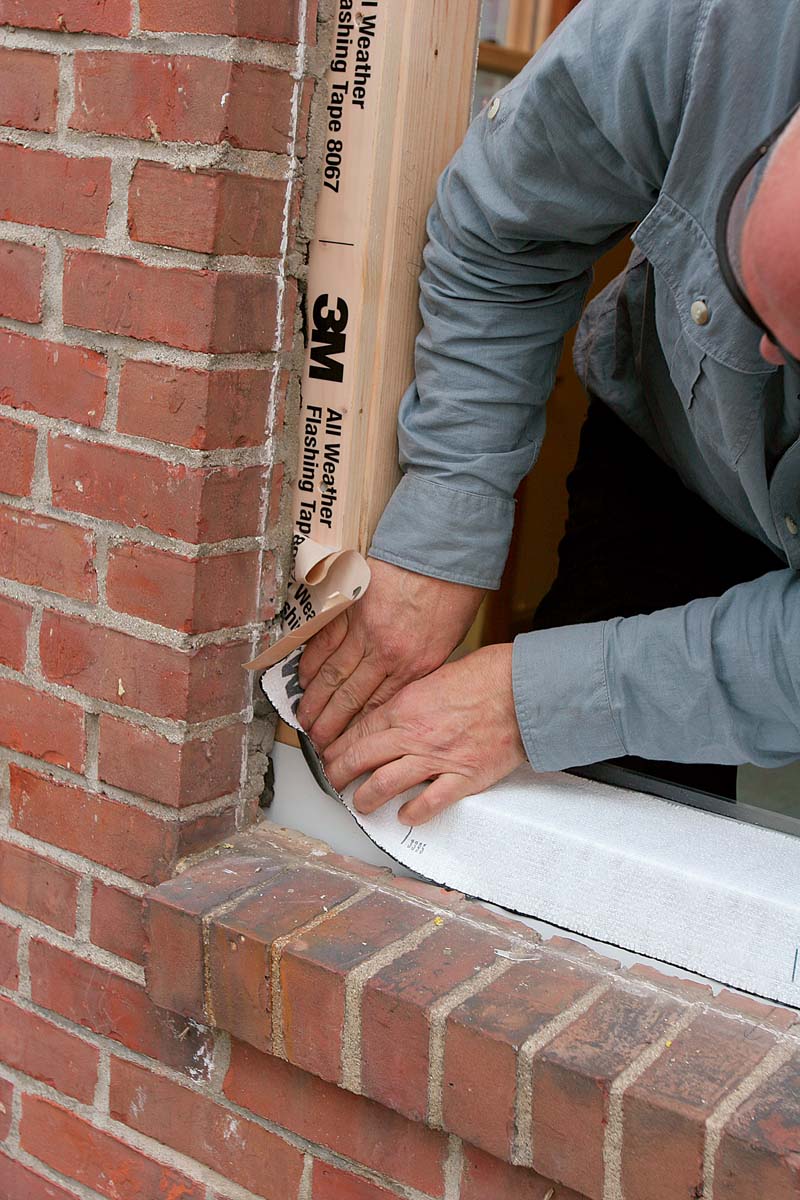
| Extend The Atmospheric condition Barrier Aluminum flashing extends the atmospheric condition-resistive bulwark upwards to the new subsill. The flashing is lapped over the existing felt and is tacked in place with aluminum trim nails. The loose flap of flashing tape in the corners of the opening will eventually lap over a sill-pan flashing. | Create A Back Dam A back dam prevents infiltrated water from getting within the house. A piece of vinyl wall edging (commonly used to protect wall-papered outside corners) makes a swell low-profile back dam. It's temporarily held in place with flashing tape until it can be covered with the flexible sill-pan flashing. |
 | 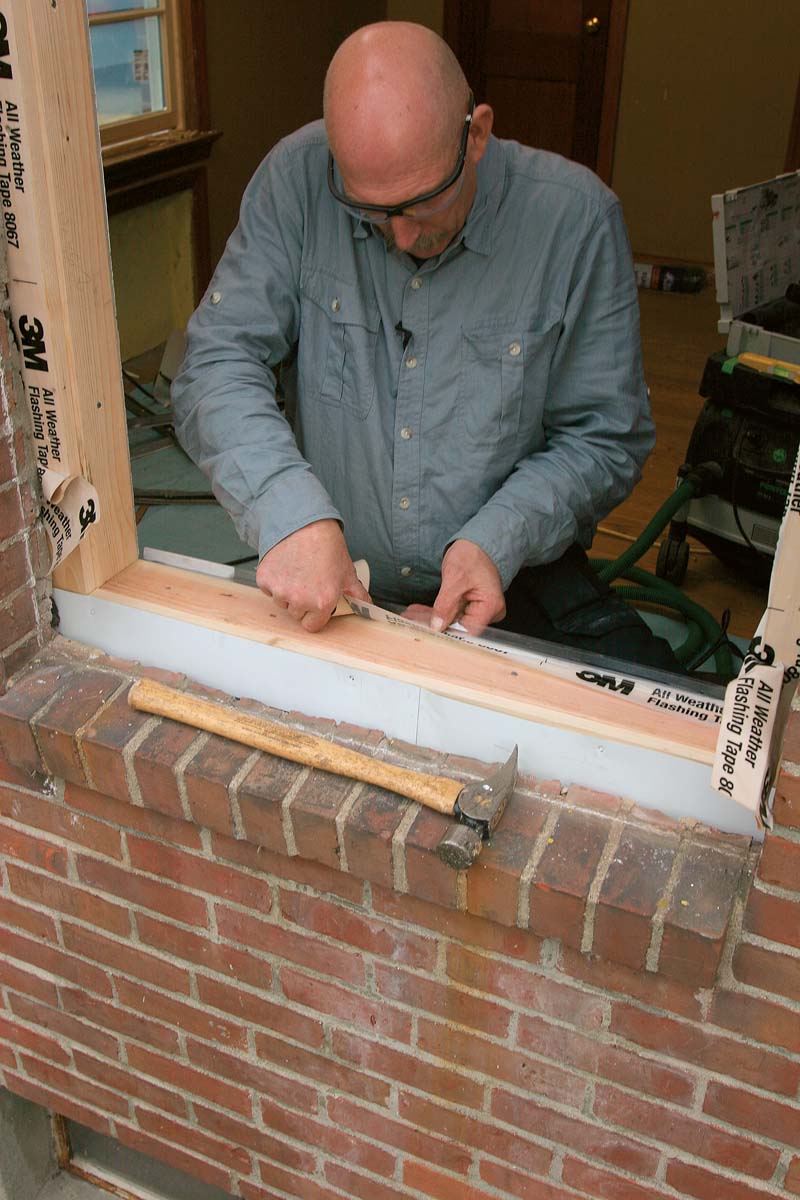 |
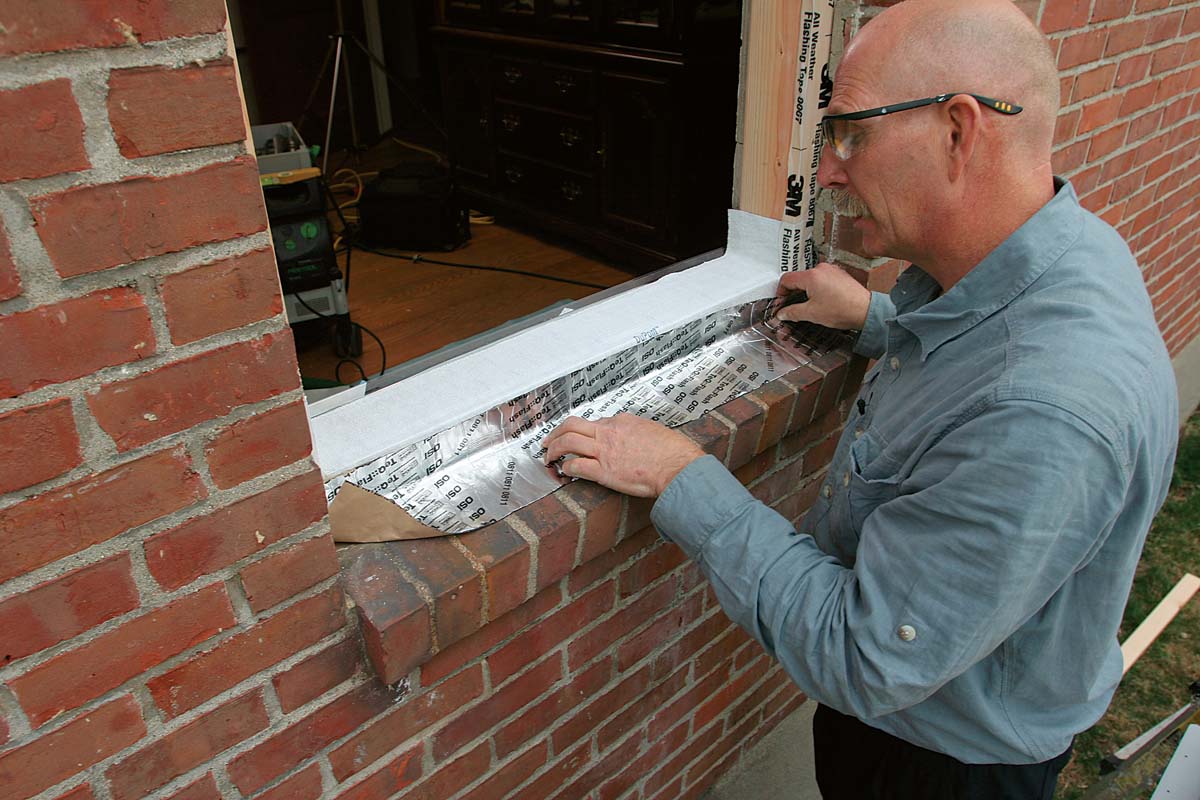
| Sill Pan Stops Water After removing the release paper, the writer carefully lays in a piece of DuPont FlexWrap as a sill-pan flashing. Where the sill meets the jack studs, he makes sure the flashing corners are pressed firmly to the opening so that they form a tight xc° corner. Otherwise, the window frame can cut through the pan flashing when the window is pushed into the opening. | Add together A Tempest Flap To forbid current of air-driven rain from getting under the window and backside the brick, it's a adept idea to install a storm flap on meridian of the brick sill. This piece of foil-faced, self-adhesive flashing volition exist trimmed affluent later. Although it'due south a practiced idea everywhere, this detail is peculiarly important on second-story windows considering the status (or fifty-fifty the existence) of the weather-resistive bulwark below the window can't be known. |
 |  |
Install the window
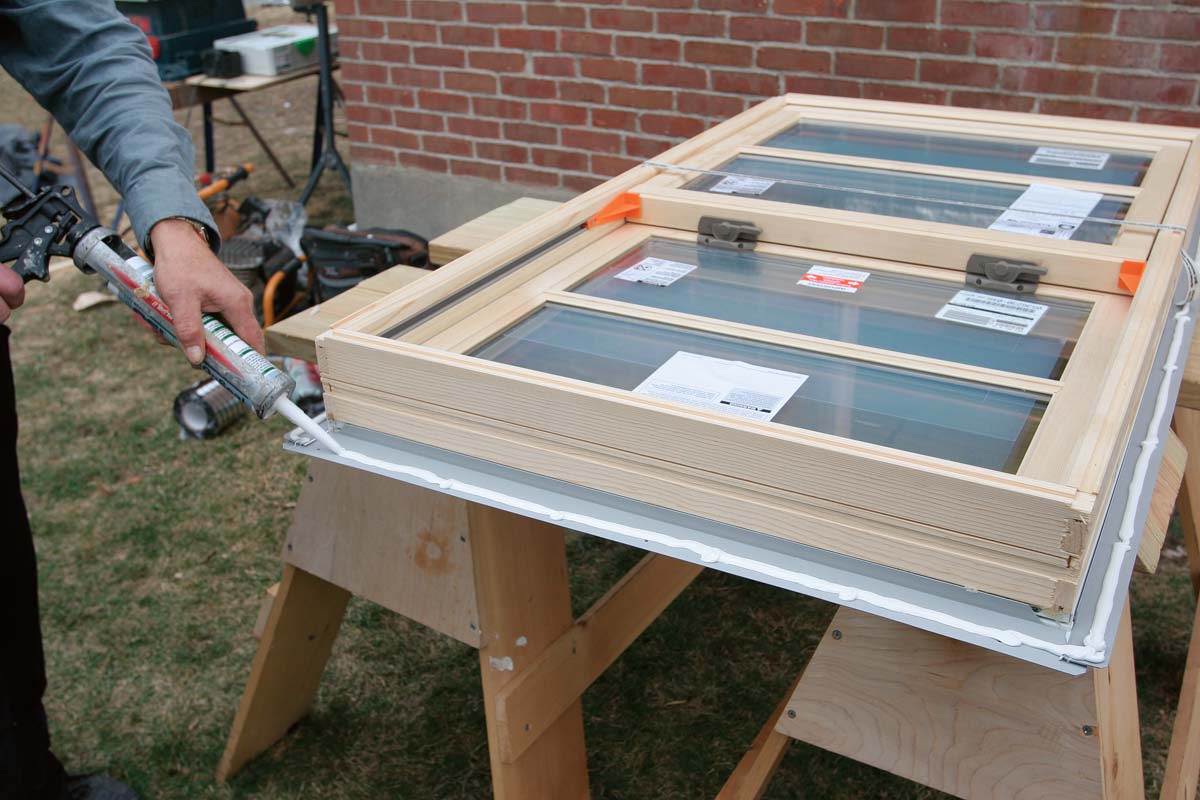
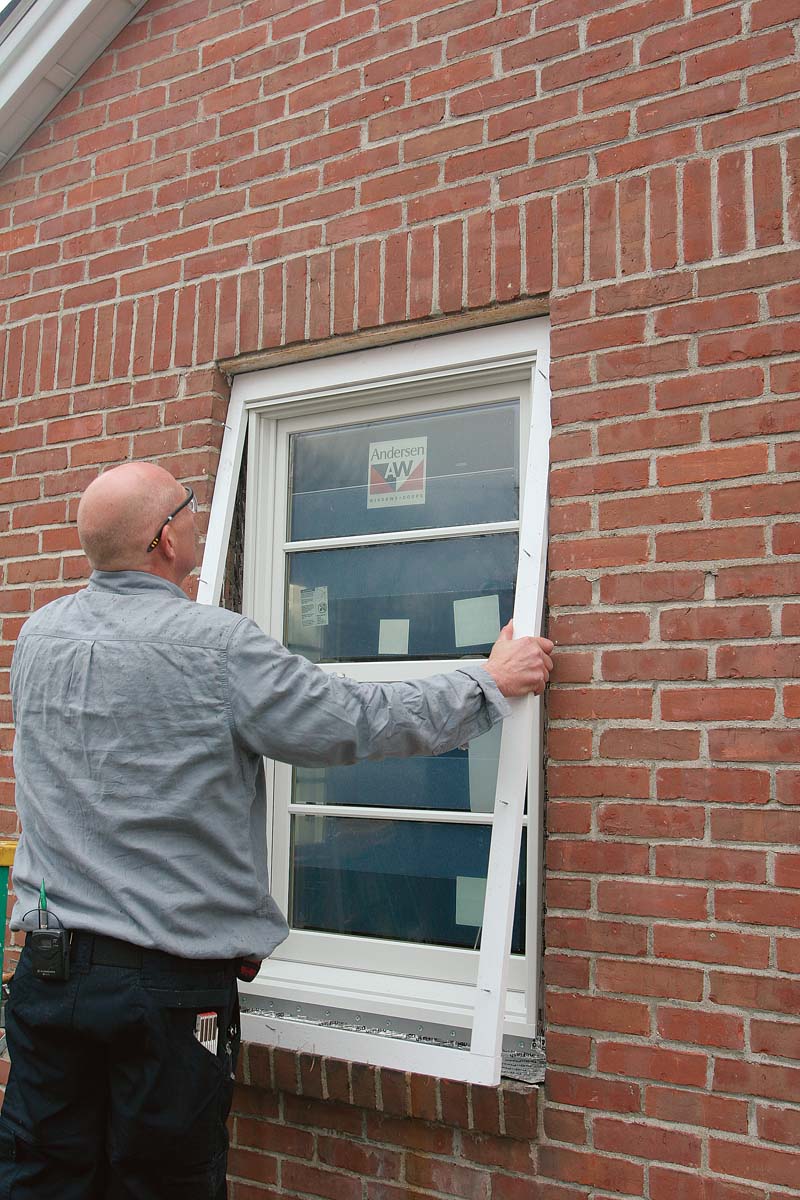
| Caulk The Nailing Flange The author puts a heavy bead of sealant on the window'due south side and top nailing flanges. The bottom is left uncaulked and then that whatever infiltrated water can drain out. Information technology's important that the flashing and the sealants are compatible because some solvent-based sealants set on some flashing tapes. With the frame resting on the rough sill and centered in the rough opening, tilt the window slowly into identify. With the window centered in the opening, use two 1 ane ⁄ 4 -in. pan-caput screws to secure the nailing flange. | Shim The Jambs It'southward important to shim the frame straight before fully fastening the nailing flange on the exterior; otherwise, the window won't operate smoothly. Once the unit of measurement is shimmed, finish fastening the nailing flange—every hole for loftier-air current zones, every other pigsty elsewhere. |
 |  |
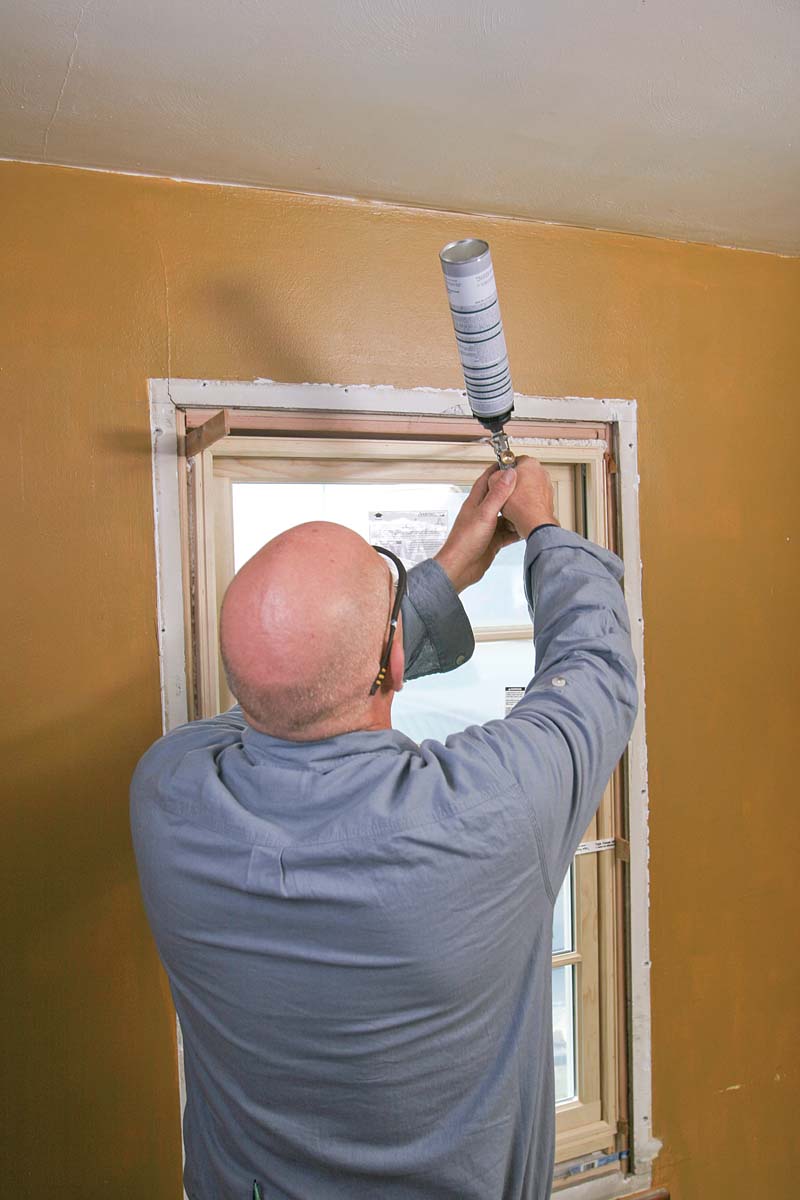
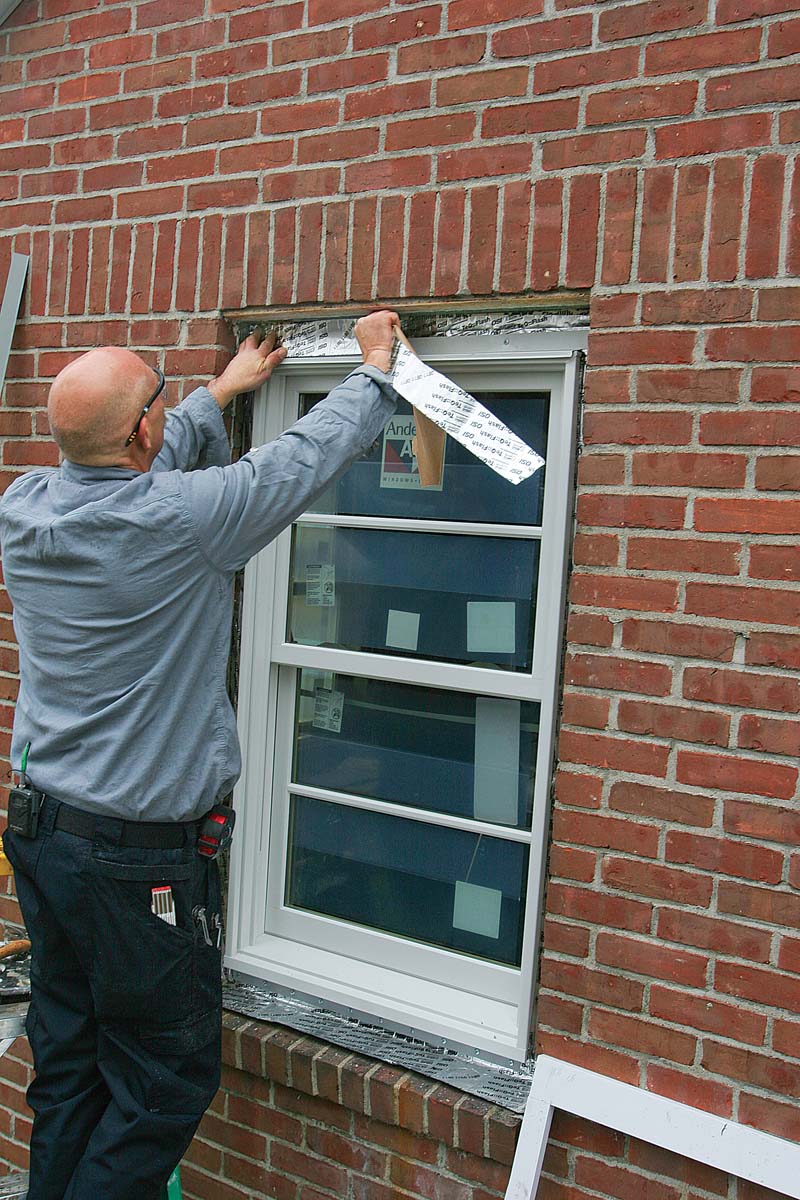
| Cream The Gap Minimally expanding window-and-door foam is used to seal the gap between the window frame and the rough opening. At the bottom, the writer fills simply an inch or so along the interior side of the opening. The single bead of foam stops air without trapping water. | Flash The Flange Cover the side flanges and then the top flange with foil-faced flashing tape. The foil tape'south agglutinative is less tenacious, so it'due south easier to tuck the tape behind the brick. Tuck its tiptop border under the flap created with the kickoff layer of flashing record applied to the sheathing patches. |
 |  |
Extra sealing for actress insurance
| Embrace The Drip Cap A layer of foil flashing tape installed over the head flashing integrates the head flashing into the drainage plane. The top edge of the self-adhesive flashing is tucked under the flap left in the weather-bulwark tape that covers the sheathing patch. | Slip In A Head Flashing An Fifty-shaped flashing aptitude with a metallic restriction sheds water over the casing. Its vertical leg is tucked under the flap left in the weather-barrier tape that also shields the foil record over the head flashing. Friction holds it while the casing is fit beneath. |
 |  |
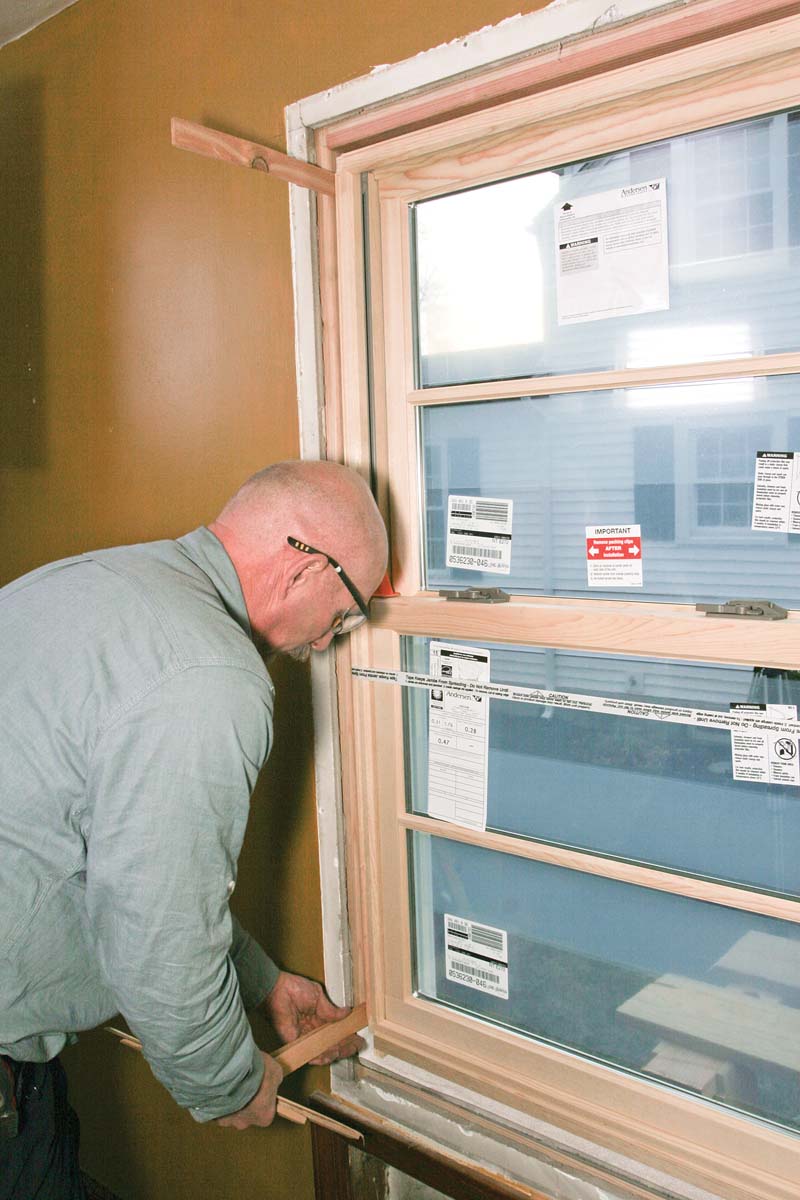
| Install The Casing Made from cellular PVC, the site-assembled casing has corners secured with pocket screws. To make installation easier, the stainless-steel trim-head screws are started in the stock. The casing is one ⁄ 4 in. undersize to allow for a one ⁄ eight -in. caulk joint around the perimeter. | Seal And Trim The Tempest Flap Sealant under the storm flap keeps it in place and prevents air current-driven water from getting underneath. The flap is extra insurance confronting h2o infiltration and preserves the free-draining attributes of the other flashing materials. |
 |  |
| Caulk The Trim The final stride is to caulk the casing to the window frame and the brick veneer with window-and-door sealant. The gap above the head casing and weep holes at the bottom remain uncaulked, allowing infiltrated water to drain out. | 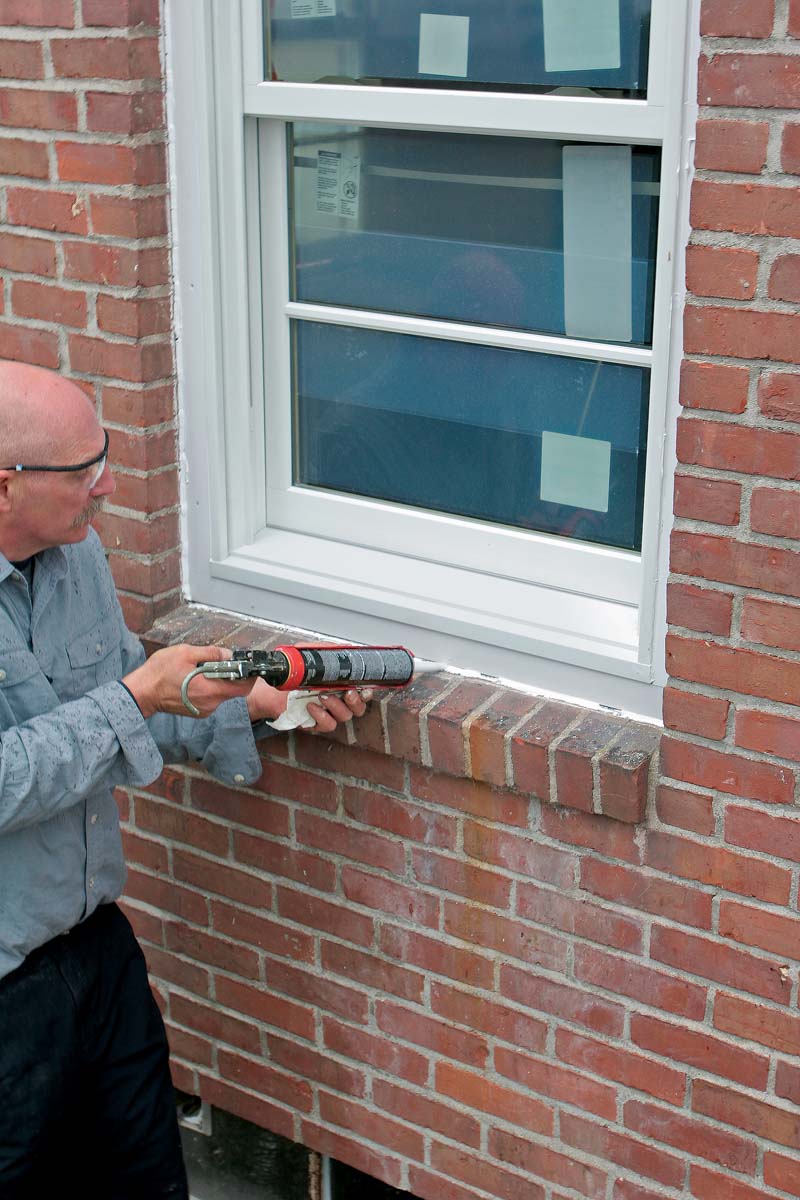 |
For more photos and details on window replacements in brick veneered homes, click the View PDF button below.
Source: https://www.finehomebuilding.com/project-guides/windows-doors/new-window-in-a-brick-house
Posted by: ellismandred48.blogspot.com
0 Response to "How To Install Windows In A Brick House"
Post a Comment